


How to Lay Turf Perfectly
Why choose turf
Laying turf is the perfect method for achieving quick and professional results in your garden. If your garden is a subject to high traffic; such as pets, sports or outdoor play, turf is the perfect cost effective option for you. There are many benefits to using turf over artificial grass and seeding:
The Benefits of Turf
- Durable
- Absorbent
- Replenishes air
- Barrier to fire damage
- Regulates temperature
- Reduces noise
Once laid, turf can be walked on after 3 weeks, unlike seeding which takes around 6-8 weeks to be fully established.
When to Lay Turf?
Turf can be laid any season of the year providing the soil below is not frozen, immensely dry or waterlogged. We recommended laying turf between mid-autumn and late winter with the condition that the soil is not too wet or frosty. The autumn weather means little mowing and lower maintenance, so newly-laid turf can be left relatively undisturbed for several weeks. Turf laid in spring often needs watering and we recommended checking the soil if it hasn't rained, as it may be too dry. If this is the case, water the soil before laying your turf and avoid mowing in the first month to allow the roots to settle in the soil. If you have no choice but to lay your turf in the summer, it is important to make sure there is lots of moisture in the soil. Laying turf in the summer requires greater care due to the heat, it is important not to walk or use the grass for approximately 6-8 weeks whilst the turf is settling into the soil.
Our Guide to Laying Turf
At Gravel Master we like to make sure our customers get the most value from all our quality products, therefore we have written a step by step guide informing you on how to lay our turf correctly for best results. This guide tells you everything you need to know from the planning and preparation stage, right through to the aftercare of your lawn; we have also included some top tips along the way.
Tools for Laying Turf
- Wheelbarrow
- Rake
- Knife
- Spade
- Planks
- Garden Hose
Planning Stage
The weather is a significant contributing factor when it comes to laying your Gravel Master turf, we advise you to lay your turf in mild conditions. Do not lay turf in frosty weather and avoid leaving your turf outside for long periods time in hot weather before laying it. All of our turf is cut fresh on the day before delivery ensuring it arrives in the best condition possible. A few weeks before your turf arrives, the first step is to select a topsoil to lay the turf on. The topsoil you choose is extremely important and will assist you in achieving a high quality lawn once completed. The Gravel Master ProBlend Turfing Soil will act as a superb base for turfing and is designed to enhance turf strength and durability. To ensure the grass roots infiltrate equally, it is essential to evenly spread the topsoil.
Calculating How Much Turf and Topsoil You Require
To calculate how much topsoil you require you will need to measure the length, width and depth of the area you want to cover, then multiply these together to give you the volume you need, you can do this by using our topsoil calculator. At Gravel Master we supply our ProBlend Turfing Soil in volumes of 800 litres/0.5m3. You will then need to calculate the amount of turf required, all Gravel Master turf is supplied in standard m2 rolls. If you measure the length and width in meters and then times these together it will give you the amount in m2.
Soil Preparation
Before your turf arrives, you need to prep your soil ready for laying your new turf:
- Eliminate perennial weeds such as couch grass or bindweed well before beginning to prepare the soil. Use weedkiller, or hand weed. Do not use residual weedkiller, as it can remain in the soil and will prevent the grass from establishing.
- The site should be dug or rotovated to a depth of 20-25cm (8-10in).
- Dig in some well-rotted manure or other organic matter (especially on a sandy soil) to hold moisture. Make sure it is well-rotted, as un-rotted organic matter will cause the soil surface to sink unevenly as it decays.
- After cultivation leave for several days to settle - the longer the better, ideally five to six weeks or more, however this is not essential.
- Before the next stage of preparation, remove any weeds that have germinated. Hand-removal is best, or use a contact weedkiller. Do not use a residual weedkiller, as it will prevent the grass from establishing.
- To get the level surface that is crucial for the best lawns, tread the area several times in different directions and then rake several times also in different directions. Apply and rake in 70g per sq m (2oz per sq yd) of general purpose fertiliser
Once the topsoil is laid you should walk over the whole area to make sure it is well compacted, this will help create a solid structure for your turf. This process should be repeated until you have created a compacted and level base for your turf. This will minimise the risk of settlement which could cause the turf to sink and become uneven.
*Top Tip* use a ruler to make sure the topsoil is evenly spread and 10-15 cm deep for optimal results. Add more topsoil if required.
You must make sure your soil base is free of stones, pebbles and debris before laying your turf. All Gravel Master ProBlend Turfing Soils are peat free and have minimal stone content, making them perfect for the job. Once you have ensured the topsoil is compacted and at the right level, lightly rake it again, but be sure not to make the surface uneven. Having an even surface is a crucial part to the overall success of your finished lawn. If you put more effort you into creating a level surface, it increases the chances of greater, high quality results.
*Top Tip* Water the soil a few days before laying your Gravel Master turf, this will give moisture to the soil and allow it to settle.
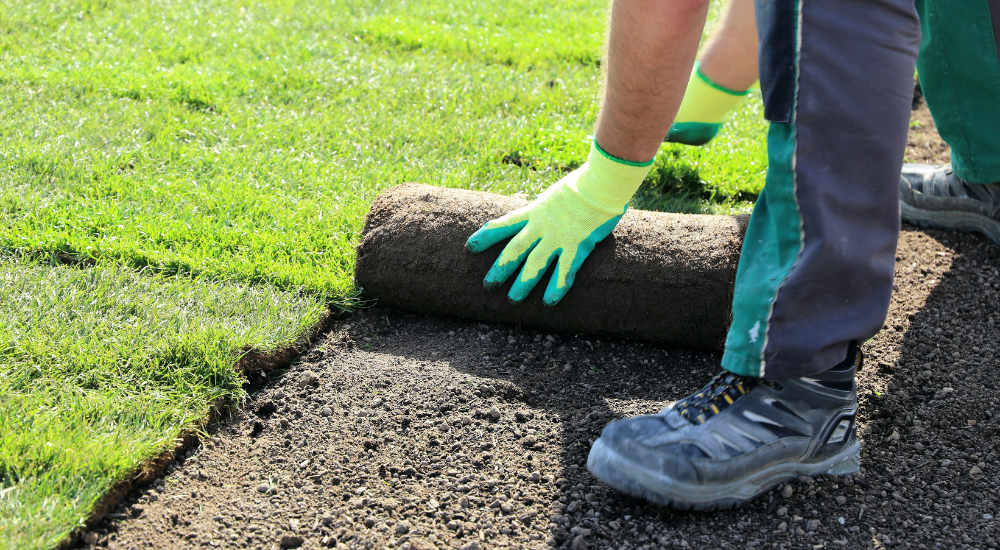
Preparing the turf
If laying is delayed, then the turf should be laid out flat to avoid any discolouring and weakening, but where possible laying sho